Showing posts with label Treats for Halloween. Show all posts

Wednesday, October 8, 2014

30 Days of Halloween~Day 24 Simple fruit treats

Looking for something quick and easy to throw into those lunch boxes or to bring to school for treats?  These are perfect!!

You simply press three chocolate chips into the banana for a ghost face!  My girls LOVED having these with their lunch and thought it was so fun!
 And for these~just draw in a Jack-O-Lantern face.  I used mandarin oranges this time but I've done it with peaches too! These were a fun surprise for the kids in their lunch box.  They thought I was so cool! ;) 
Have a happy day~Kasey


Follow me!

Friday, October 3, 2014

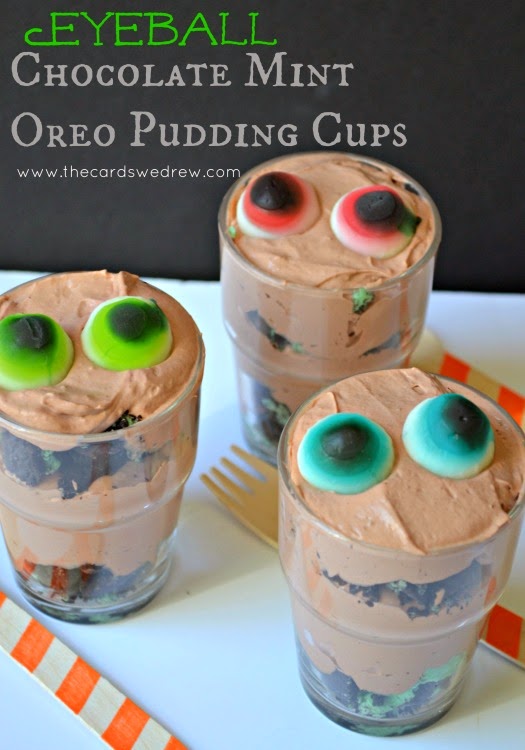
30 Days of Halloween~Day 19 Eyeball Pudding Cups

I'm sharing another from my friend at Cupcake Diaries!  Alli had a guest blogger share these cute eyeball pudding cups!  Click HERE to see the post and follow the links to the recipe and to Alli's 30 Days of Halloween which is full of adorable and delicious Halloween things!! 
Have a happy day~Kasey


Follow me!

Wednesday, October 1, 2014

30 Days of Halloween~Day 17 Halloween decorated Cake Roll

Oh my~yummy!!  I haven't had the chance to make this yet but I am dying to!  I found it on Best Friends for Frosting, but it was a guest post from Sugar for the Brain!  Go check them both out!!!  Two pages full of deliciousness!!  Click HERE To see the tutorial!

Photo from Best Friends for Frosting
 
 
Have a happy day~Kasey
 
 
Follow me!

Sunday, September 28, 2014

30 Days of Halloween~Day 14 Mummy Yummy

The kids and I had so much fun making these delicious cookie pops!  Oreos, white chocolate, mini M&Ms..awesome!!

Cute right?!?!  Follow these simple instructions and you can be enjoying yours too!

Grab those popsicle sticks and stick them in the cream in the Oreos.  After that you dip the cookie pops in the melted white chocolate chunks.  Stick some M&Ms in for eyes and drape some of the white chocolate around the cookie for rags. 

WAHLA~super cute Mummy Yummy!!!

Have a happy day~Kasey


Follow me!

Thursday, September 25, 2014

My Witch Cupcakes for Day 11 of my 30 Days of Halloween

These cupcakes for Day 11 are seriously adorable! We did them a few years ago for our "You've Been Booed."  The kids had fun making, decorating, and giving out these
Witch Cupcakes!


Ingredients
~cake mix (and items to make it)
~ice cream cones (we used these colored ones for our family but used brown ones to give away)
~chocolate icing
~sprinkles
~white icing
~food colorings
~chocolate chips for garnishing (two per cupcake)
~Mike N Ikes
~baggies for piping (or a piping bag and lid)

Directions
~bake cupcakes according to package directions
~while they are cooling, split the icing as follows: a couple spoonsful of white to keep it white, just a spoonful of white to make green, a spoonful of white to make it red, and the rest to be green.  When using food coloring always use just a drop at a time, then mix until you get the color you desire.  I used the neon food coloring to make the bright green of the face.
~Once the cupcakes are cooled, take the wrappers off and frost the top with the green.  Lay sideways.
~Take your chocolate chips and frost point with a bit of white frosting (or you could use the same as the face, but I liked mine to look like eyeballs in the white of the eye..) Push into frosted cupcake at top for eyes.
~Put red frosting in the piping bag or the corner of a Ziploc bag with the very corner cut off.  Make smiles at the bottom of the cupcake.
~Use the green Mike N Ikes for noses.
~I used the green frosting (also piping bag or Ziploc with corner cut) for warts on the witch's face.
~Put some chocolate icing in the bag and frost hair onto the top side of the (sideways) cupcake.
~Also frost edge of ice cream cone then dip in the sprinkles. Then put the cone on the hair.

There's your witch!!  Super cute and fun!!  They are great to be used for party treats, treats to give away, or just to give the kids the ingredients and let them decorate their own!

Have a happy day~Kasey

~You could also use pull-n-peel licorice for the mouth instead of the red frosting.
~Another substitute could be to get the small tubes of green/red frosting for the smile and warts instead of the colored frosting!
~Mini chocolate chips would be great too!

Follow me!


Wednesday, September 24, 2014

Day 10-Jack Skellington Cupcakes

One of my favorites from Halloween is the Nightmare Before Christmas!  I seriously love it!  I came across these cupcakes and pinned them years ago!  I knew I had to share them with you for Day 10! 

Photo Courtesy of the Confessions of a Cookbook Queen website
 
So dang cute!  Just click HERE to be taken to the recipe from Confessions of a Cookbook Queen.   Kristan has so many wonderful recipes.  You will be obsessed with her stuff! 
 
Have a happy day~Kasey
 
 
Follow me!

Sunday, September 21, 2014

30 Days of Halloween~Day 7 Graveyard Cupcakes

I have been wanting to share these with you since September 1st!  My sweet friend Alli at Cupcake Diaries is doing her 30 Days of Halloween. She started on September 1st and posted these for day 1.  I knew immediately I LOVED them and wanted everyone to know about them.  Granted~she is far more advanced in this blogger world than I, but I do have my wonderful friends who don't know about her goodness yet..so check her out!!! :D 

Anyway~look at these CUTE things she created!!!! 
See~super cute!  They would be so fun for a Halloween party, family treats for Halloween, or even something fun for the kids to make and take to friends!  Find the recipe here then get baking!!
 
Have a happy day~Kasey
 
 
Follow me!

Wednesday, September 17, 2014

Give the gift of fun and yum!! 30 Days of Halloween~Day 3

I am super excited to share my Day 3 with you!!!!  Last year we heard a knock on our door, and it wasn't "You've Been Booed!"  It was a Ziploc bag full of mini cakes, candy, and icing, with a little instruction sheet.  It was a gift one of our neighbors handed out to the families with kids and seriously~it is the cutest idea ever!!!!  It was a fun night and the kids enjoyed making...and eating their cakes!
 
This was the best picture I got of the instructions. 
First thing first~frost those cakes!  We were given 3 mini cakes and two cupcakes. 
 Then we decorated those cakes.  Black licorice for the hair, eyebrows, and mouth.  Neccos and Smarties for the eyes, Smarties for the nostrils, and Dum-Dums for the screws...Aaaaaand Heeeeelllo Frankenstein!!!   
 For the cupcakes we used black licorice for the hair and whiskers, Candy Corn for the ears, eyes, and mouth.  Neccos were the nose, and the girls decided to use some Smarties as part of the mouth/nose as well.  Heeeeelloo Kitty Cat!! 
 I loved how they all had the same ingredients but their cakes looked different.  We really had fun and it was the best little neighbor gift ever!!!  Make some cakes, buy some icing and candy, and hand them out to your neighbors!  Super cute!!!

Have a happy day~Kasey

Follow me!

Monday, September 15, 2014

Peanut Butter Spiders~30 Days of Halloween!!

I am SO excited about me "30 Days of Halloween!"  If you know me~you know how much I LOVE Halloween~seriously one of the best holidays ever!!!!!!!!!!!!  


For today's kickoff, I'm going to share with you one of the easiest treats you could make!  They're super easy and fun for the kids to help make! 

Peanut Butter Spiders!!!

Ingredients
~Ritz crackers
~peanut butter
~pretzel sticks
~chocolate chips or chocolate melts, whichever you prefer
~mini M&M's

Directions
~First thing's first, melt the chocolate with just a touch of water.  I do it in the microwave.  Microwave for one minute, stir.  If it's still clumpy then melt in 30 second increments, stirring between each (because oftentimes the movement breaks up the clumps and it doesn't really need to be heated anymore)!
~Once that is melted, you dip one side of the Ritz crackers in.  Place the chocolate face-up on wax paper.  Before they start to dry, you need to place two M&M's on half the crackers, for eyes. (you use two crackers for one spider)
~Next break the pretzels in half and dip one end in chocolate.  Lay them on the wax paper to dry also.  (I like to put mine in the fridge to harden faster.)  You will need 6 pretzels for one spider.
~One more easy step!!!  Take those crackers without the eyes and spread on some peanut butter!  Then you take the 6 pretzels and put three on each side, make sure to place the non-chocolate side into the peanut butter.  (if you are noticing they aren't staying well, add some more peanut butter for them to actually go into)  Then you grab the crackers with the eyes and set them on top and WAALAA~a spider!!!  (if you want, you can do what I do and take a toothpick, dip it in the chocolate and put dots on the M&M's..makes them look more like eyes to me! :D )

I like to set mine up in the fridge again before serving, but the kids LOVED making these.  We made them a few years ago for the "You've Been Booed" game.  It was fun to have something they could help with and had fun dropping and running!! 

I hope you enjoy~and please check back for the next 29 days for the rest of our Halloween fun!!!

Have a happy day~Kasey


Follow me!